| |
Note: You
will need root privileges to go through the
installation. The script might work properly if
you have write privileges to your system's cgi
root and http root.
|
1.
|
Assuming that you have saved
the downloaded file to /tmp/autoweb; untar the
downloaded waspiisetup file using the commands:
# cd /tmp/autoweb
# uncompress autoweb.tar.Z
# tar xvf autoweb.tar
|
| 2. |
If you agree to use the name
"autoweb" as the autoweb directory name
(recommended); go to step 4. |
| 3. |
Decide a location to put
autoweb files into. I recommend a directory
called "autoweb" just under the http
document root or cgi-root. On most RedHat LINUX
systems, these directories are /home/httpd/html
and /home/httpd/cgi-bin respectively. If
you choose to put autoweb under the document
root, you will have to edit your httpd
configuration files (namely
/etc/httpd/conf/access.conf for Apache server)
and grant cgi execution rights to the autoweb
directory which can be easily done by adding the
lines
<Directory
/home/httpd/html/autoweb/>
AllowOverride All
Options ExecCGI Includes
</Directory>
into
access.conf. If you decide to put autoweb under
the cgi-bin, you shouldn't need to change
anything. Please do not forget to restart the
httpd daemon if you make any modifications in the
http server configuration files.
Create
a directory called "autoweb" in the
directory of your choice and copy the untarred
files to this new directory using a command like
# cd
/home/httpd/html
# mkdir autoweb
# /bin/cp -r /tmp/autoweb/* autoweb
|
| 5. |
Edit all *.cgi and *.pl files
in the autoweb directory and make sure that all
first lines mention the full and correct path to
your perl program. On the distribution files; all
programs are configured for a perl residing in
/usr/bin/perl. |
| 6. |
Make all files and
directories owned by the userID of your http
server. |
| 7. |
Edit the config.pl file and
change a few parameters that will suit your
network and hosts. |
| 8. |
@domains array:
You should enter the
identifiers of the different domains autoweb will
be serving. If you don't have different domains
on your network enter only one entry in this
array and let it be "bcc".If
you have different domains with identifiers, say,
"cs", "ee", "ie";
you should assign @domains=("cs",
"ee", "ie"); and your users
should identifiy themselves as user@cs or user@ee
when loging in to autoweb.
If there is only one domain
to server, the users do not have to identify
themselves as a member of a domain.
You should use domains if you
have different server computers for the homes of
your users. Remember, we will be ftp'İng and
telnet'ing to these hosts and the host to contact
will be selected as per the domain identifiers.
|
| 9. |
@home_servers
associative array:
This associative array (or
"hash") uses the values in @domains
array as keys and home server host names as
values. By "home server" I mean UNIX
hosts where user home directories are mounted. |
| 10. |
@http_servers
associative array:
This associative array (or
"hash") uses the values in @domains
array as keys and web server host names as
values. By "web server" I mean hosts
where an http daemon is running to serve the
users' public_html directories. |
| 11. |
$allowed_ips:
In our network, we prefer to
limit access to autoweb services only from within
our campus network. The reason is; we would hate
to have automatic password carcking software
probe our autoweb login page.If
you want to limit access to autoweb services to
specific IP's, you should enter a regular
expression as the value of $allowed_ips.
A regular expression to allow
ALL IP numbers (unlimited access) would be
$allowed_ips="/^[12]/"
We use "/^139.179/"
to limit access to our B class address.
|
| 12. |
$cookie_domain:
Normally you should set this variable to
"" (null string). If you have limited
access to autoweb services to a single internet
domain, you could enter
"domain.some.where" to play safe with
the cookies. We use "bilkent.edu.tr" as
our $cookie_domain string.
|
| 13. |
$autoweb_home:
Path to autoweb directory relative to document
root on your web server. e.g. If autoweb is
installed under /home/httpd/html/autoweb;
$autoweb_home should be "/autıweb". |
| 14. |
$upload_dir:
Absolute path to directory to put uploaded image files.
MUST end with .../tmp.
We use $upload_dir = "/home/htppd/html/autoweb/tmp". |
| 15. |
$public_html:
The standard directory name that the users must
create under their homes to put their personal
stuff. Normally this is "public_html". |
| 16. |
$mailprogram:
For security reasons, autoweb will send a mail to
the user when his/her personal web page is
created and edited. Also a notification mail is
sent when access rights to home_dir or
public_html_dir are changed. We need to know the
sendmail program's name and location to send
mails. On typical UNIX systems, the mail program
is "/usr/lib/sendmail".If
you don't want these mails to be sent, simply
assign the $mailprogram variable to a null string
( "" ).
|
| 17. |
$hotline:
Most of the web pages displayed by autoweb have
an e-mail address to help users contact a hotline
or person in case they need help. $hotline
variable should contain this contact e-mail
address. We use
$hotline="hotline\@bilkent.edu.tr". Do
not forget to escape the @ sign with a backslash. |
| 18. |
$home_url:
Most of the web pages displayed by autoweb have a
link to a site main web page. $home_url variable
should contain the http reference to this web
site/page. We use
$home_url="http://www.bilkent.edu.tr". |
| 19. |
$home_url_text:
This is the text to display describing the place
$home_url is pointing to. We use
$home_url_text="Back
to Bilkent Home". |
| 20. |
The Template Files:
You would certainly want to redesign the
template files ( template1.tmpl &
template2.tmpl ). You can use any HTML
file as templates files as long as you use the
following place-holders in your file: (a close
examination of the distributed template files
will give you an idea of what I mean and how I
use place-holders).If
you make major design changes, you will need to
edit the build.cgi PERL program extensively.
| =MYPHOTO= |
Specifies
the uploaded image file |
| =MYTITLE= |
Specifies
the browser window title |
| =MYNAMESURNAME= |
Users
"name / surname" |
| =MYFACULTY= |
Faculty or
department |
| =MYTITLE1= |
Title of
first paragraph |
| =MYTEXT1= |
Text of
first paragraph |
| =MYTITLE2= |
Title of
second paragraph |
| =MYTEXT2= |
Text of
second paragraph |
| =MYTITLE3= |
Title of
third paragraph |
| =MYTEXT3= |
Text of
second paragraph |
| =MYTITLE4= |
Title of
fourth paragraph |
| =MYTEXT4= |
Text of
second paragraph |
| =MYTITLE5= |
Title of
addres paragraph |
| =MYADDRESS1= |
First line
of address |
| =MYADDRESS2= |
Second line
of address |
| =MYADDRESS3= |
Third line
of address |
| =MYPHONE= |
Phone
number(s) |
| =MYFAX= |
Fax
number(s) |
| =MYEMAIL= |
e-mail
address |
| =MYURL= |
Personal URL
|
| |
|
Please do not
forget to prepare template1.htm and
template2.htm, and the thumbnails
template1.gif and template2.gif since
they are displayed as samples to the
user.
You can prepare the thumbnail
images by capturing your templateX.htm
file from the screen and resizing to an
acceptable thumbnail size by any image
editor.
|
| |
|
|
| |
We use the following as our
thumbnails:  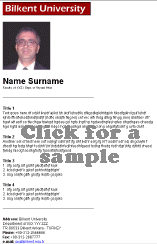
|
| 21. |
Now you should provide at
least two GIF files to offer as alternative
standard logo images to your users. the names of
these GIF files should be
"weblogo1.gif" and
"weblogo2.gif". We
use the following GIF files in our installation:
| weblogo1.gif |
 |
| weblogo2.gif |
 |
|
| 22. |
Done! You can now point your
browser to: http://your.autoweb.server.host/$autoweb_home/index.html
and start testing autoweb.
Probably you will want to
modify the main autoweb page and pages generated
on the fly. With some PERL knowledge you should
be able to do this easily. If you do not feel
confident with PERL, you can still do your
modifications if you stick to my design style.
|
| |
|